
Docker is a core part of every modern homelab server setup. It allows you to create isolated instances of apps and also making it easy for you to manage and migrate across different deployments. Learn how to install Docker on some of the most popular Homelab server systems today.
Installing Docker on Debian
The first step in installing Docker on Debian is to import the developers’ repository details to the apt package manager. This allows you to get Docker and its plugins without relying on a third-party maintainer.
Start by installing both curl and gpg on your Debian home system. These apps will allow you to pull the repository signing key as well as add it to your system’s keyring:
<span style="color: #c20cb9; font-weight: bold;">sudo</span> apt <span style="color: #c20cb9; font-weight: bold;">install</span> curl gpgNote: Debian only installs sudo if you didn’t set a root password during installation. If your system doesn’t have sudo, you can either set it up first or switch to the root user using su.
Import the signing key for the Docker developers’ package repository:
<span style="color: #c20cb9; font-weight: bold;">sudo</span> curl <span style="color: #660033;">-fsSL</span> https:<span style="color: #000000; font-weight: bold;">//</span>download.docker.com<span style="color: #000000; font-weight: bold;">/</span>linux<span style="color: #000000; font-weight: bold;">/</span>debian<span style="color: #000000; font-weight: bold;">/</span>gpg <span style="color: #000000; font-weight: bold;">|</span> <span style="color: #c20cb9; font-weight: bold;">sudo</span> gpg <span style="color: #660033;">--dearmor</span> <span style="color: #660033;">-o</span> <span style="color: #000000; font-weight: bold;">/</span>etc<span style="color: #000000; font-weight: bold;">/</span>apt<span style="color: #000000; font-weight: bold;">/</span>keyrings<span style="color: #000000; font-weight: bold;">/</span>docker.gpg<br /><span style="color: #c20cb9; font-weight: bold;">sudo</span> <span style="color: #c20cb9; font-weight: bold;">chmod</span> a+r <span style="color: #000000; font-weight: bold;">/</span>etc<span style="color: #000000; font-weight: bold;">/</span>apt<span style="color: #000000; font-weight: bold;">/</span>keyrings<span style="color: #000000; font-weight: bold;">/</span>docker.gpgCreate a new repository file
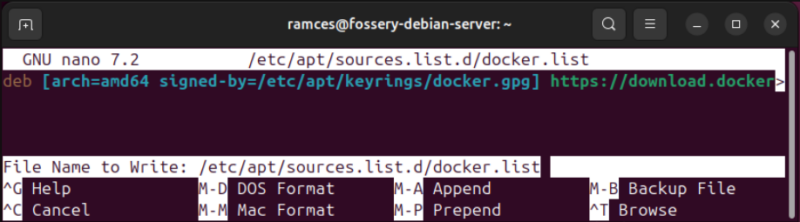
<span style="color: #c20cb9; font-weight: bold;">sudo</span> <span style="color: #c20cb9; font-weight: bold;">nano</span> <span style="color: #000000; font-weight: bold;">/</span>etc<span style="color: #000000; font-weight: bold;">/</span>apt<span style="color: #000000; font-weight: bold;">/</span>sources.list.d<span style="color: #000000; font-weight: bold;">/</span>docker.listand add the following repository information:
deb <span style="color: #7a0874; font-weight: bold;">[</span><span style="color: #007800;">arch</span>=amd64 signed-by=<span style="color: #000000; font-weight: bold;">/</span>etc<span style="color: #000000; font-weight: bold;">/</span>apt<span style="color: #000000; font-weight: bold;">/</span>keyrings<span style="color: #000000; font-weight: bold;">/</span>docker.gpg<span style="color: #7a0874; font-weight: bold;">]</span> https:<span style="color: #000000; font-weight: bold;">//</span>download.docker.com<span style="color: #000000; font-weight: bold;">/</span>linux<span style="color: #000000; font-weight: bold;">/</span>debian bookworm stableSave and exit your new repository file. In nano, you can do this by pressing Ctrl + X, typing “Y” on the prompt, then pressing Enter on the default file path.
Refresh your system’s package repos, then perform a full system upgrade:
<span style="color: #c20cb9; font-weight: bold;">sudo</span> apt update <span style="color: #000000; font-weight: bold;">&&</span> <span style="color: #c20cb9; font-weight: bold;">sudo</span> apt upgrade <span style="color: #660033;">-y</span>Install the core Docker package along with its companion plugin Compose:
<span style="color: #c20cb9; font-weight: bold;">sudo</span> apt <span style="color: #c20cb9; font-weight: bold;">install</span> <span style="color: #660033;">-y</span> docker-ce docker-ce-cli containerd.io docker-compose-plugin docker-buildx-pluginConfirm that Docker is working properly on your system by restarting your machine and running the following command:
<span style="color: #c20cb9; font-weight: bold;">sudo</span> <span style="color: #c20cb9; font-weight: bold;">docker</span> —version
Add yourself to the docker group so you can run docker without root:
<span style="color: #c20cb9; font-weight: bold;">sudo</span> usermod <span style="color: #660033;">-aG</span> <span style="color: #c20cb9; font-weight: bold;">docker</span> <span style="color: #007800;">$USER</span>Installing Docker on Ubuntu
Similar to Debian, deploying Docker on Ubuntu starts with importing the repository signing key for the official Docker repo:
curl <span style="color: #660033;">-fsSL</span> https:<span style="color: #000000; font-weight: bold;">//</span>download.docker.com<span style="color: #000000; font-weight: bold;">/</span>linux<span style="color: #000000; font-weight: bold;">/</span>ubuntu<span style="color: #000000; font-weight: bold;">/</span>gpg <span style="color: #000000; font-weight: bold;">|</span> <span style="color: #c20cb9; font-weight: bold;">sudo</span> gpg <span style="color: #660033;">--dearmor</span> <span style="color: #660033;">-o</span> <span style="color: #000000; font-weight: bold;">/</span>etc<span style="color: #000000; font-weight: bold;">/</span>apt<span style="color: #000000; font-weight: bold;">/</span>keyrings<span style="color: #000000; font-weight: bold;">/</span>docker.gpg<br /><span style="color: #c20cb9; font-weight: bold;">sudo</span> <span style="color: #c20cb9; font-weight: bold;">chmod</span> a+r <span style="color: #000000; font-weight: bold;">/</span>etc<span style="color: #000000; font-weight: bold;">/</span>apt<span style="color: #000000; font-weight: bold;">/</span>keyrings<span style="color: #000000; font-weight: bold;">/</span>docker.gpg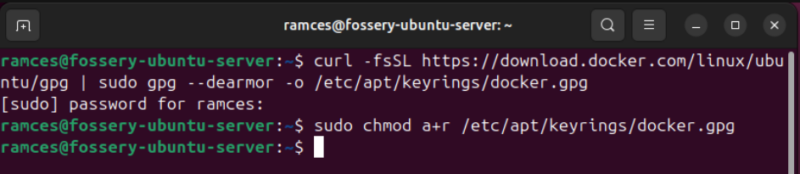
Create a new repository file for Docker using your favorite text editor:
<span style="color: #c20cb9; font-weight: bold;">sudo</span> <span style="color: #c20cb9; font-weight: bold;">nano</span> <span style="color: #000000; font-weight: bold;">/</span>etc<span style="color: #000000; font-weight: bold;">/</span>apt<span style="color: #000000; font-weight: bold;">/</span>sources.list.d<span style="color: #000000; font-weight: bold;">/</span>docker.listPaste the following line of code inside your new repository file:
deb <span style="color: #7a0874; font-weight: bold;">[</span><span style="color: #007800;">arch</span>=amd64 signed-by=<span style="color: #000000; font-weight: bold;">/</span>etc<span style="color: #000000; font-weight: bold;">/</span>apt<span style="color: #000000; font-weight: bold;">/</span>keyrings<span style="color: #000000; font-weight: bold;">/</span>docker.gpg<span style="color: #7a0874; font-weight: bold;">]</span> https:<span style="color: #000000; font-weight: bold;">//</span>download.docker.com<span style="color: #000000; font-weight: bold;">/</span>linux<span style="color: #000000; font-weight: bold;">/</span>ubuntu noble stableRefresh the system’s repo listings and update your Ubuntu machine:
<span style="color: #c20cb9; font-weight: bold;">sudo</span> apt update <span style="color: #000000; font-weight: bold;">&&</span> <span style="color: #c20cb9; font-weight: bold;">sudo</span> apt upgrade <span style="color: #660033;">-y</span>Install the Docker engine package along with its dependencies and plugins:
<span style="color: #c20cb9; font-weight: bold;">sudo</span> apt <span style="color: #c20cb9; font-weight: bold;">install</span> <span style="color: #660033;">-y</span> docker-ce docker-ce-cli containerd.io docker-compose-plugin docker-buildx-pluginAdd your regular user to the docker system group. This will ensure that you can run Docker even without sudo:
<span style="color: #c20cb9; font-weight: bold;">sudo</span> usermod <span style="color: #660033;">-aG</span> <span style="color: #c20cb9; font-weight: bold;">docker</span> <span style="color: #007800;">$USER</span> <span style="color: #000000; font-weight: bold;">&&</span> <span style="color: #7a0874; font-weight: bold;">logout</span>Log back in to your system and test your new installation by creating and running the “hello-world” Docker container:
<span style="color: #c20cb9; font-weight: bold;">docker</span> run hello-world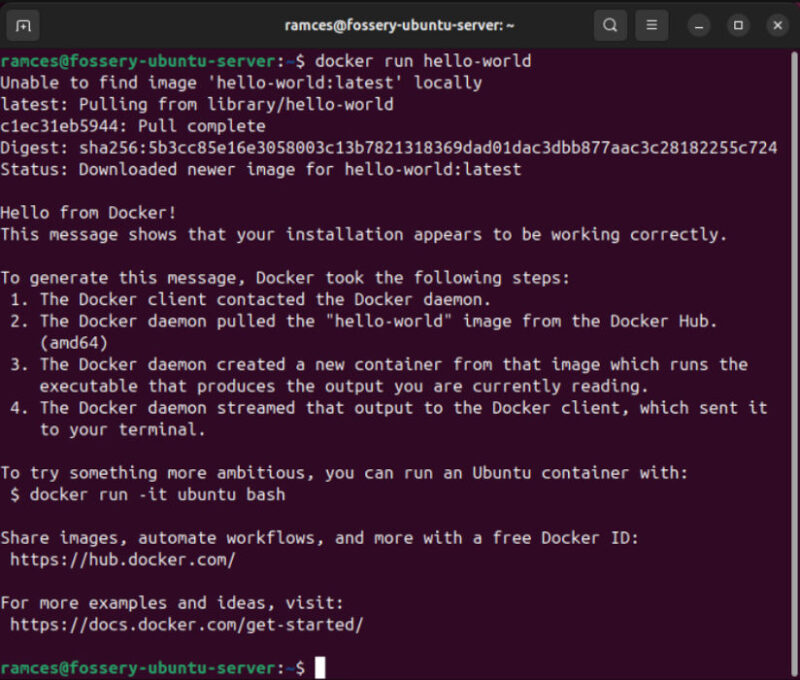
Installing Docker on Fedora
Unlike Debian and Ubuntu, you don’t need to create a repository file and import signing keys to install Docker on Fedora. Instead, you can directly import the developer’s repo file into the DNF package manager.
Begin by installing the core plugins for DNF. This will allow you to add and manage external repositories directly from DNF:
<span style="color: #c20cb9; font-weight: bold;">sudo</span> dnf <span style="color: #c20cb9; font-weight: bold;">install</span> <span style="color: #660033;">-y</span> dnf-plugins-core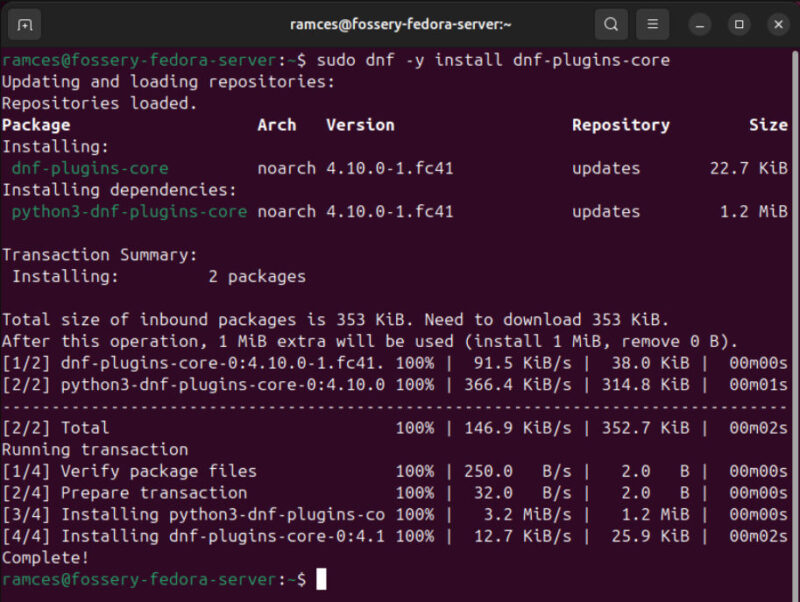
Import the official Docker repofile for Fedora using the “config-manager” subcommand:
<span style="color: #c20cb9; font-weight: bold;">sudo</span> dnf-<span style="color: #000000;">3</span> config-manager <span style="color: #660033;">--add-repo</span> https:<span style="color: #000000; font-weight: bold;">//</span>download.docker.com<span style="color: #000000; font-weight: bold;">/</span>linux<span style="color: #000000; font-weight: bold;">/</span>fedora<span style="color: #000000; font-weight: bold;">/</span>docker-ce.repoReload your OS’ package listing by performing a system update:
<span style="color: #c20cb9; font-weight: bold;">sudo</span> dnf updateInstall Docker along with its core plugins and dependencies by running the following command:
<span style="color: #c20cb9; font-weight: bold;">sudo</span> dnf <span style="color: #c20cb9; font-weight: bold;">install</span> <span style="color: #660033;">-y</span> docker-ce docker-ce-cli containerd.io docker-buildx-plugin docker-compose-plugin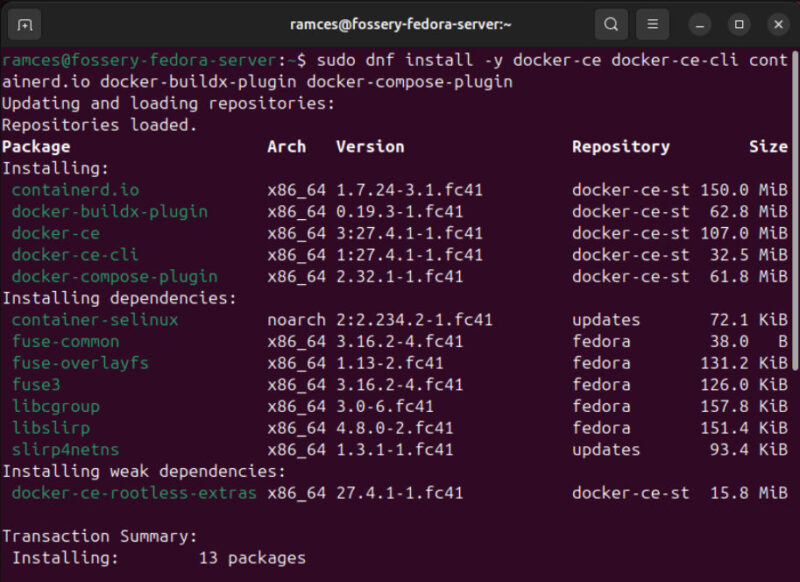
Start the Docker service daemon on your machine:
<span style="color: #c20cb9; font-weight: bold;">sudo</span> systemctl <span style="color: #7a0874; font-weight: bold;">enable</span> <span style="color: #660033;">--now</span> docker.serviceAdd your current user to the Docker system group:
<span style="color: #c20cb9; font-weight: bold;">sudo</span> usermod <span style="color: #660033;">-aG</span> <span style="color: #c20cb9; font-weight: bold;">docker</span> <span style="color: #007800;">$USER</span> <span style="color: #000000; font-weight: bold;">&&</span> <span style="color: #7a0874; font-weight: bold;">logout</span>After logging back in, check if Docker is working properly by building the hello-world container:
<span style="color: #c20cb9; font-weight: bold;">docker</span> run hello-worldInstalling Docker on Rocky Linux
Just like with Fedora, installing Docker on Rocky Linux only requires you to import the official repository URL from the developer’s website:
<span style="color: #c20cb9; font-weight: bold;">sudo</span> dnf config-manager <span style="color: #660033;">--add-repo</span> https:<span style="color: #000000; font-weight: bold;">//</span>download.docker.com<span style="color: #000000; font-weight: bold;">/</span>linux<span style="color: #000000; font-weight: bold;">/</span>rhel<span style="color: #000000; font-weight: bold;">/</span>docker-ce.repoFetch and install Docker, its dependencies and plugins:
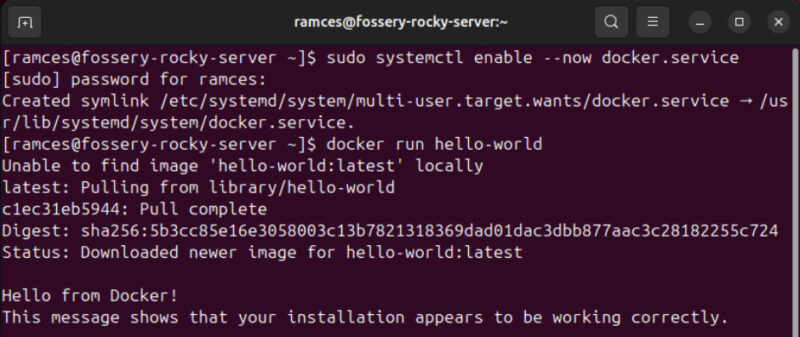
<span style="color: #c20cb9; font-weight: bold;">sudo</span> dnf <span style="color: #660033;">-y</span> <span style="color: #c20cb9; font-weight: bold;">install</span> docker-ce docker-ce-cli containerd.io docker-compose-plugin docker-buildx-pluginEnable the Docker server on your Rocky Linux home server:
<span style="color: #c20cb9; font-weight: bold;">sudo</span> systemctl <span style="color: #7a0874; font-weight: bold;">enable</span> <span style="color: #660033;">--now</span> docker.serviceAfter that, confirm that you’ve installed the program properly on the machine by adding your user account to the Docker system group and running a simple container.
Installing Docker on Arch Linux
In contrast to other systems, Arch Linux provides an up-to-date version of Docker and Docker Compose in its default repositories. This means that you don’t need to import an external repository and can immediately use pacman to install the program:
<span style="color: #c20cb9; font-weight: bold;">sudo</span> pacman <span style="color: #660033;">-S</span> <span style="color: #c20cb9; font-weight: bold;">docker</span> docker-compose docker-buildxAdd your regular user to your Docker system group:
<span style="color: #c20cb9; font-weight: bold;">sudo</span> usermod <span style="color: #660033;">-aG</span> <span style="color: #c20cb9; font-weight: bold;">docker</span> <span style="color: #007800;">$USER</span>Enable and start the Docker systemd process:
<span style="color: #c20cb9; font-weight: bold;">sudo</span> systemctl <span style="color: #7a0874; font-weight: bold;">enable</span> <span style="color: #660033;">--now</span> docker.service<br /><span style="color: #c20cb9; font-weight: bold;">sudo</span> systemctl start docker.serviceTest whether Docker is working properly in Arch Linux by running the following command:
<span style="color: #c20cb9; font-weight: bold;">docker</span> run hello-world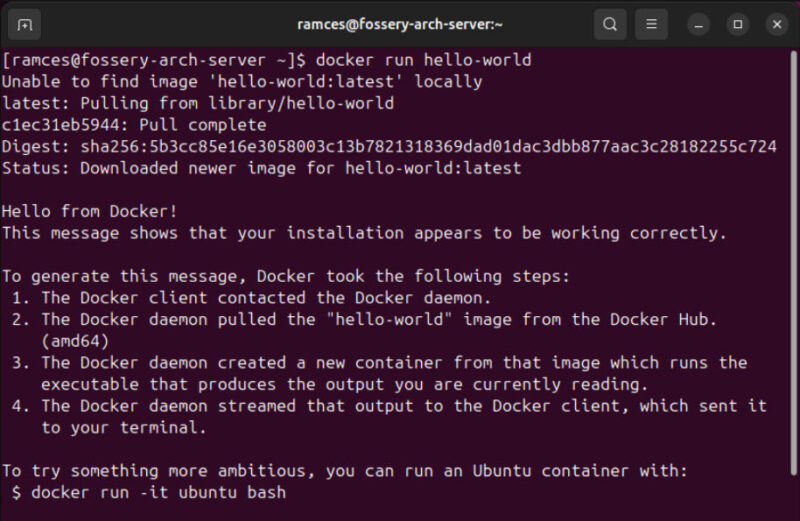
Installing Docker on some of the popular home server OSes today is just the tip of the iceberg when it comes to self-hosting. Learn how to secure your home server today by checking out our guide to setting up a firewall on Linux.
Image credit: unsplash. All screenshots and alterations by Ramces Red.
Be the first to comment! Get the discussion going.